
Quick Start
On this page
- 2.1 Before Installation
- 2.2 Installing CREVIA
- 2.3 First Start, Login, and Interface Language
- 2.4 Licensing and Trial Use
- 2.5 Creating Your First Credential
- 2.5.1 Create a Project Folder
- 2.5.2 Automatically Create the Standard Database
- 2.5.3 Build a Simple Layout
- 2.6 Creating Your First Record and Printing
- 2.6.1 Open the Layout in COC
- 2.6.2 Add a Demonstration Person
- 2.6.3 Preview and Print
- 2.7 Completion Check
This chapter takes a first-time user through installation, language and license checks, automatic creation of a standard personnel database, a simple credential design, one demonstration record, and print preview.
Use Create Database to generate the standard database. This workflow does not require manually creating tables, entering connection strings, or writing SQL.
2.1 Before Installation
Prepare a writable local project folder for the database and layout, a valid CREVIA license file or an eligible online trial environment, and a printer installed and available in Windows. You may complete the preview first without printing.
Prepare a user account with CDPS design and COC operations permissions. In open-access mode, the corresponding program can be entered without a system login.
Note: Do not store databases, layouts, or license files in temporary, download, or automatically cleaned locations. Use a separate folder for each project.
2.2 Installing CREVIA
- Close previous CDPS, COC, and update utility instances.
- Run the official installer and complete its wizard.
- Start Credential Design & Policy Studio (CDPS) from the Start menu or installation folder.
- For a first installation, start CDPS and then Credential Operations Console (COC), confirming that both open normally.
Do not manually replace DLLs, license files, or database templates in the installation directory. Use CREVIAUpdata for software updates.
2.3 First Start, Login, and Interface Language
- Start CDPS.
- If access control is enabled, sign in with a design-authorized user. Open-access mode does not require this login.
- Select the required interface language. COC subsequently reads the same shared language setting.
- Confirm that ribbons, dialogs, and messages use the intended language before creating project data.
Training and manual illustrations should use the same interface language as the document.
2.4 Licensing and Trial Use
Check the license status and edition in About in CDPS or COC.
- If you have received a license file, use Load License File to import the officially issued license.
- Without a production license, a trial may be offered under the current policy. Internet access and device validation requirements apply.
- The database, dynamic fields, and printing workflow in this chapter require the relevant licensed functions.
If a command is unavailable, check the edition, current user's permissions, and access-control state. Do not modify program or configuration files to enable it.
2.5 Creating Your First Credential
2.5.1 Create a Project Folder
Create a local folder, for example D:\CREVIAProjects\DemoStaffCard. Store this example's generated database and layout there to simplify backup and migration. This is a demonstration path, not a required installation location.
2.5.2 Automatically Create the Standard Database
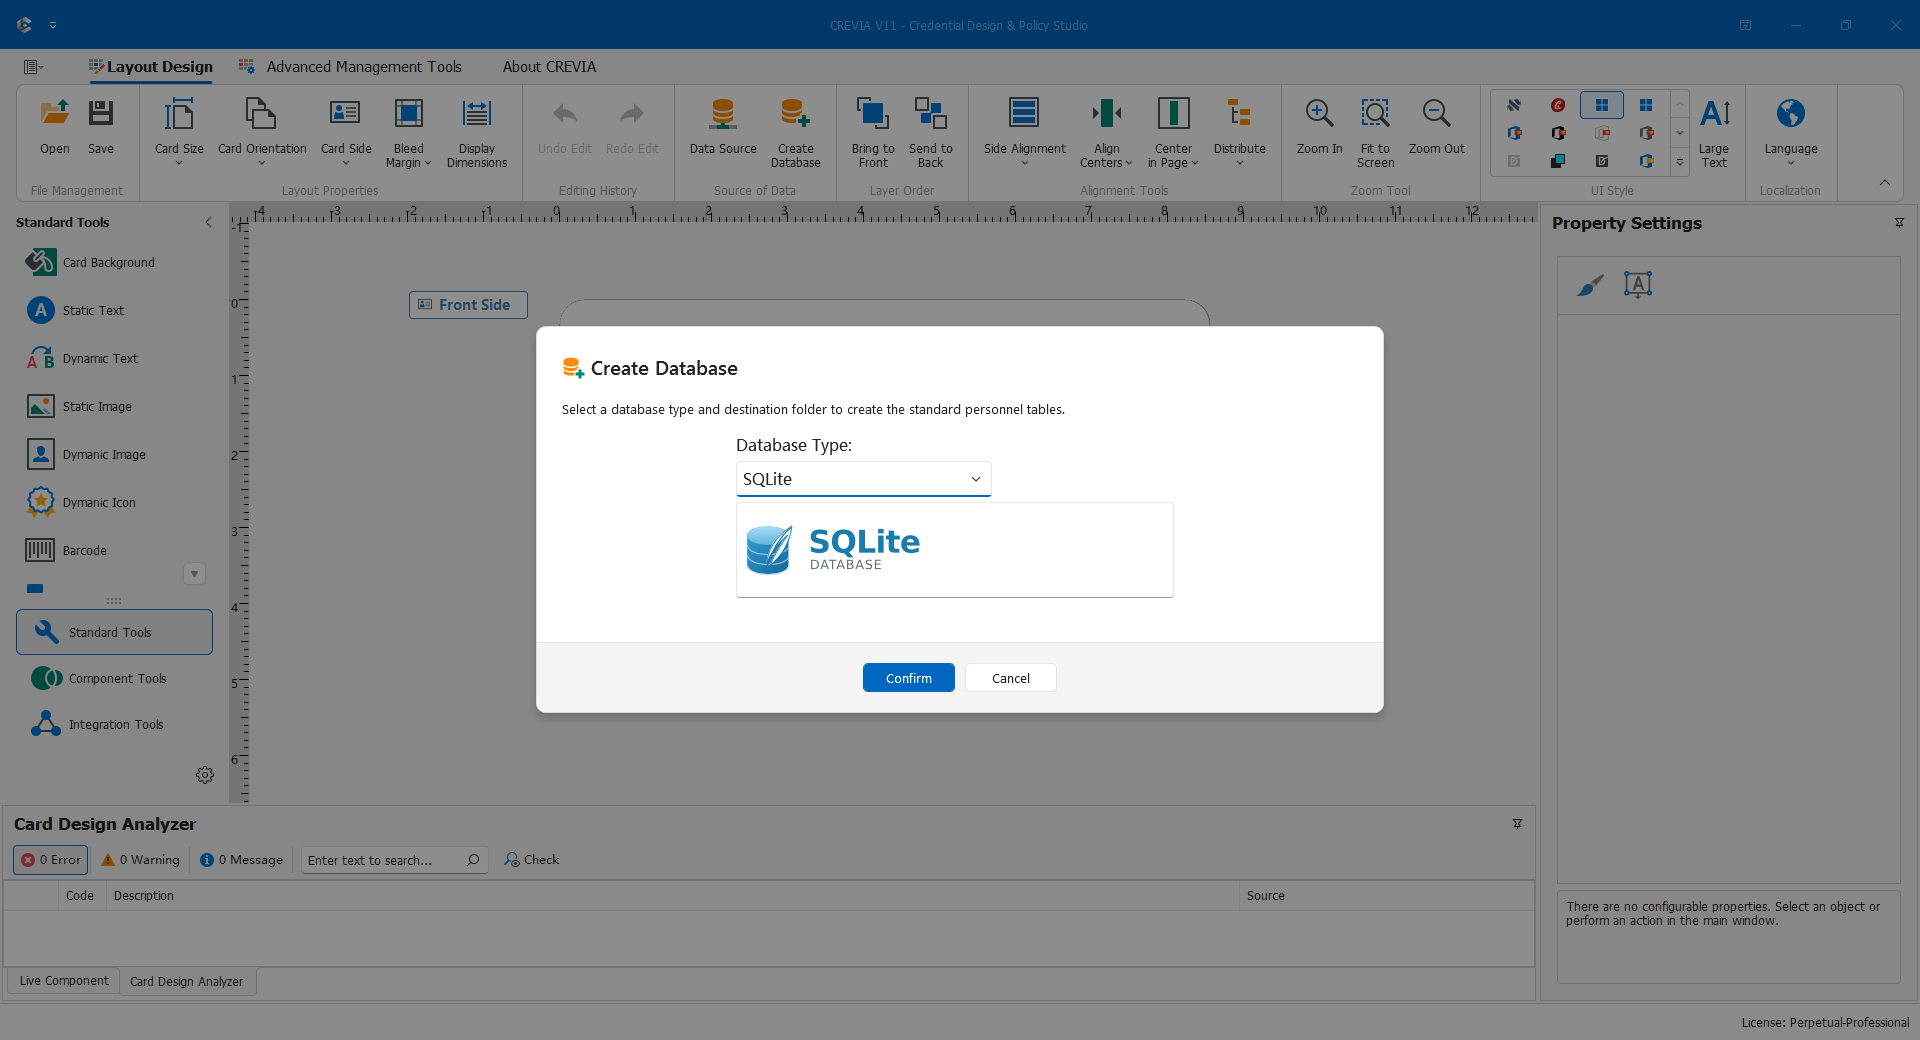
- In the CDPS data source area, select Create Database.
- Choose SQLite, a single-file database suitable for an initial evaluation and small projects.
- In the folder picker displayed after confirmation, select the project folder. The system generates the database name according to the interface language; there is no name to enter.
- Confirm the selection.
- Wait for the database-created message.
The software uses its built-in template and creates the standard personnel tables. You do not manually create fields, photo tables, or connection strings.
Note: This exercise does not use Excel as its standard database. Excel is useful for tabular exchange, but is not an appropriate substitute for a complete personnel database with photos and relationships.
2.5.3 Build a Simple Layout
- Keep the newly created standard database as the current data source.
- Create or retain a blank layout and choose the card size and landscape or portrait orientation.
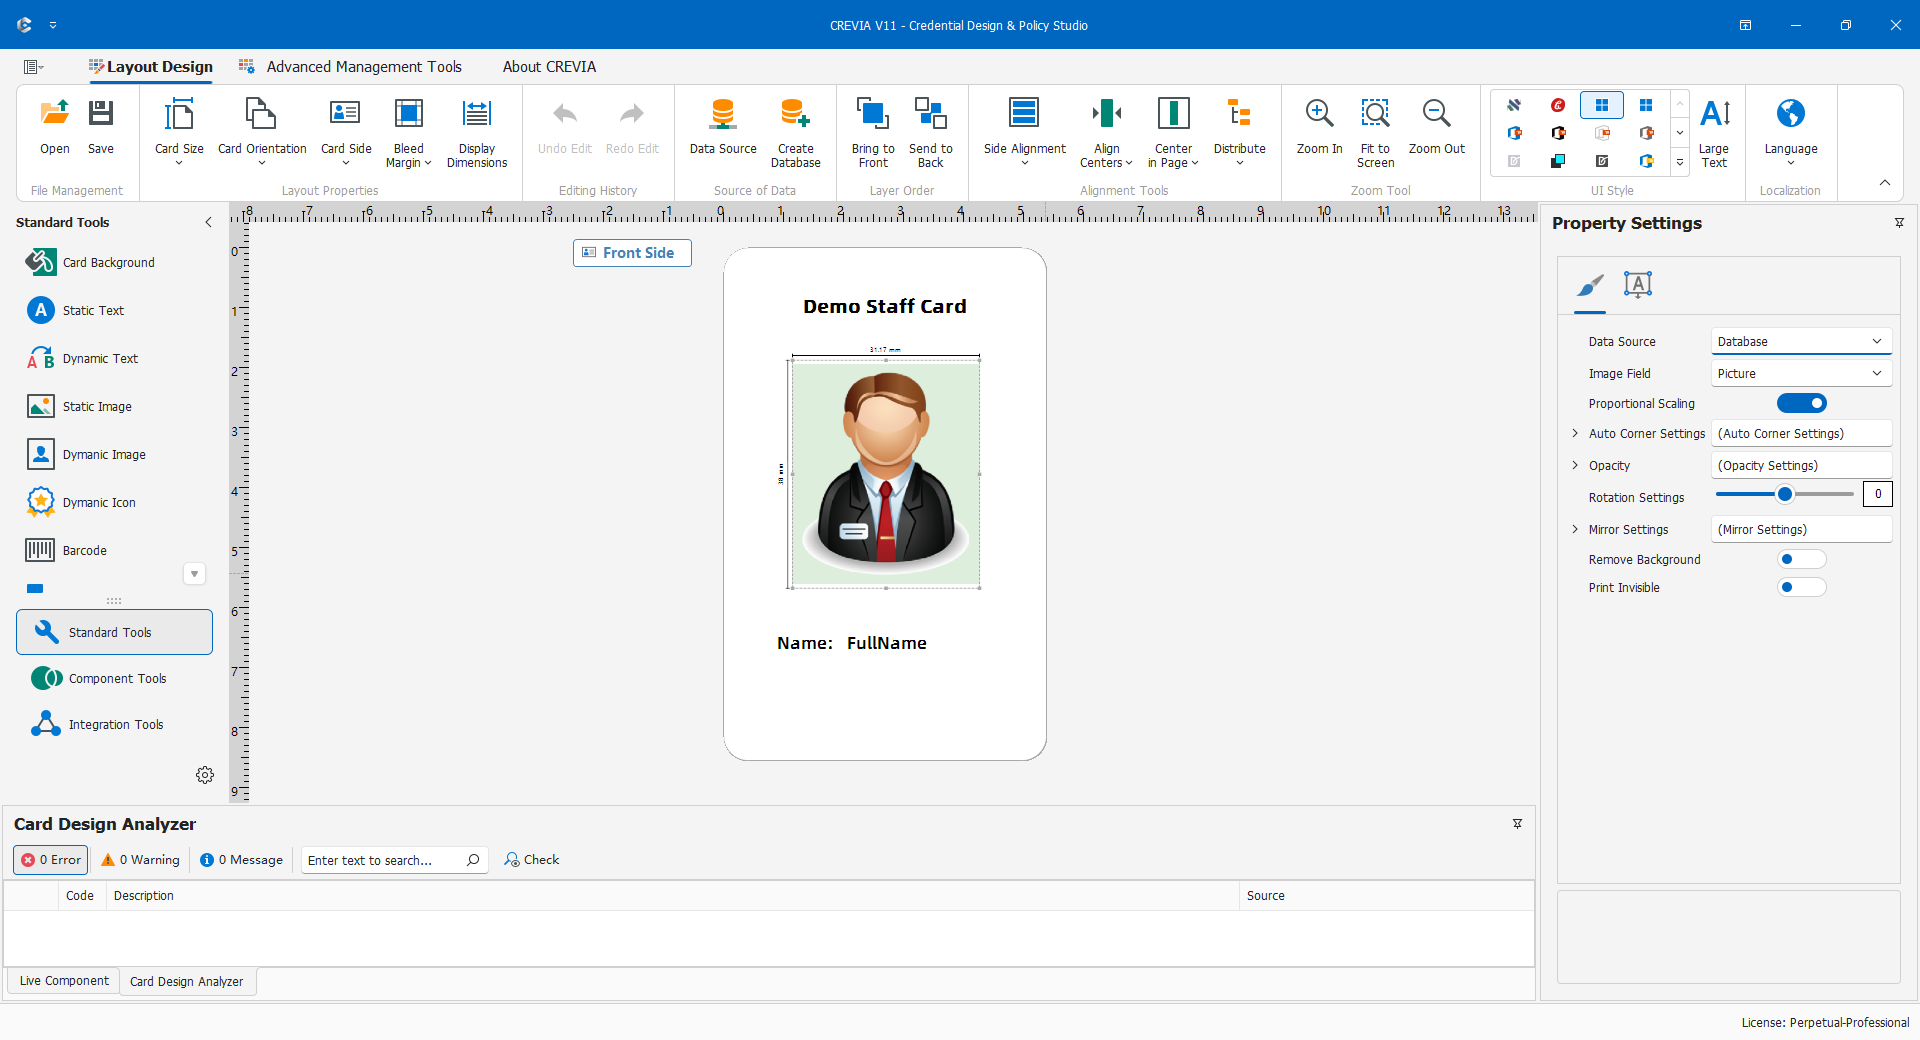
- Add static text, such as "Demo Staff Card".
- Add dynamic text and select a personnel name field in its data properties.
- If a photo is needed, add a dynamic image and choose the standard database's photo field.
- Arrange the objects using move, resize, and alignment tools.
- Save the layout to the project folder, for example
DemoStaffCard.skdCard.
For the first design, concentrate on showing dynamic values correctly. Barcodes, RFID, external interfaces, reports, and imposition can be added later.
2.6 Creating Your First Record and Printing
2.6.1 Open the Layout in COC
- Start COC and sign in with a user authorized for the operations console. No system login is needed in open-access mode.
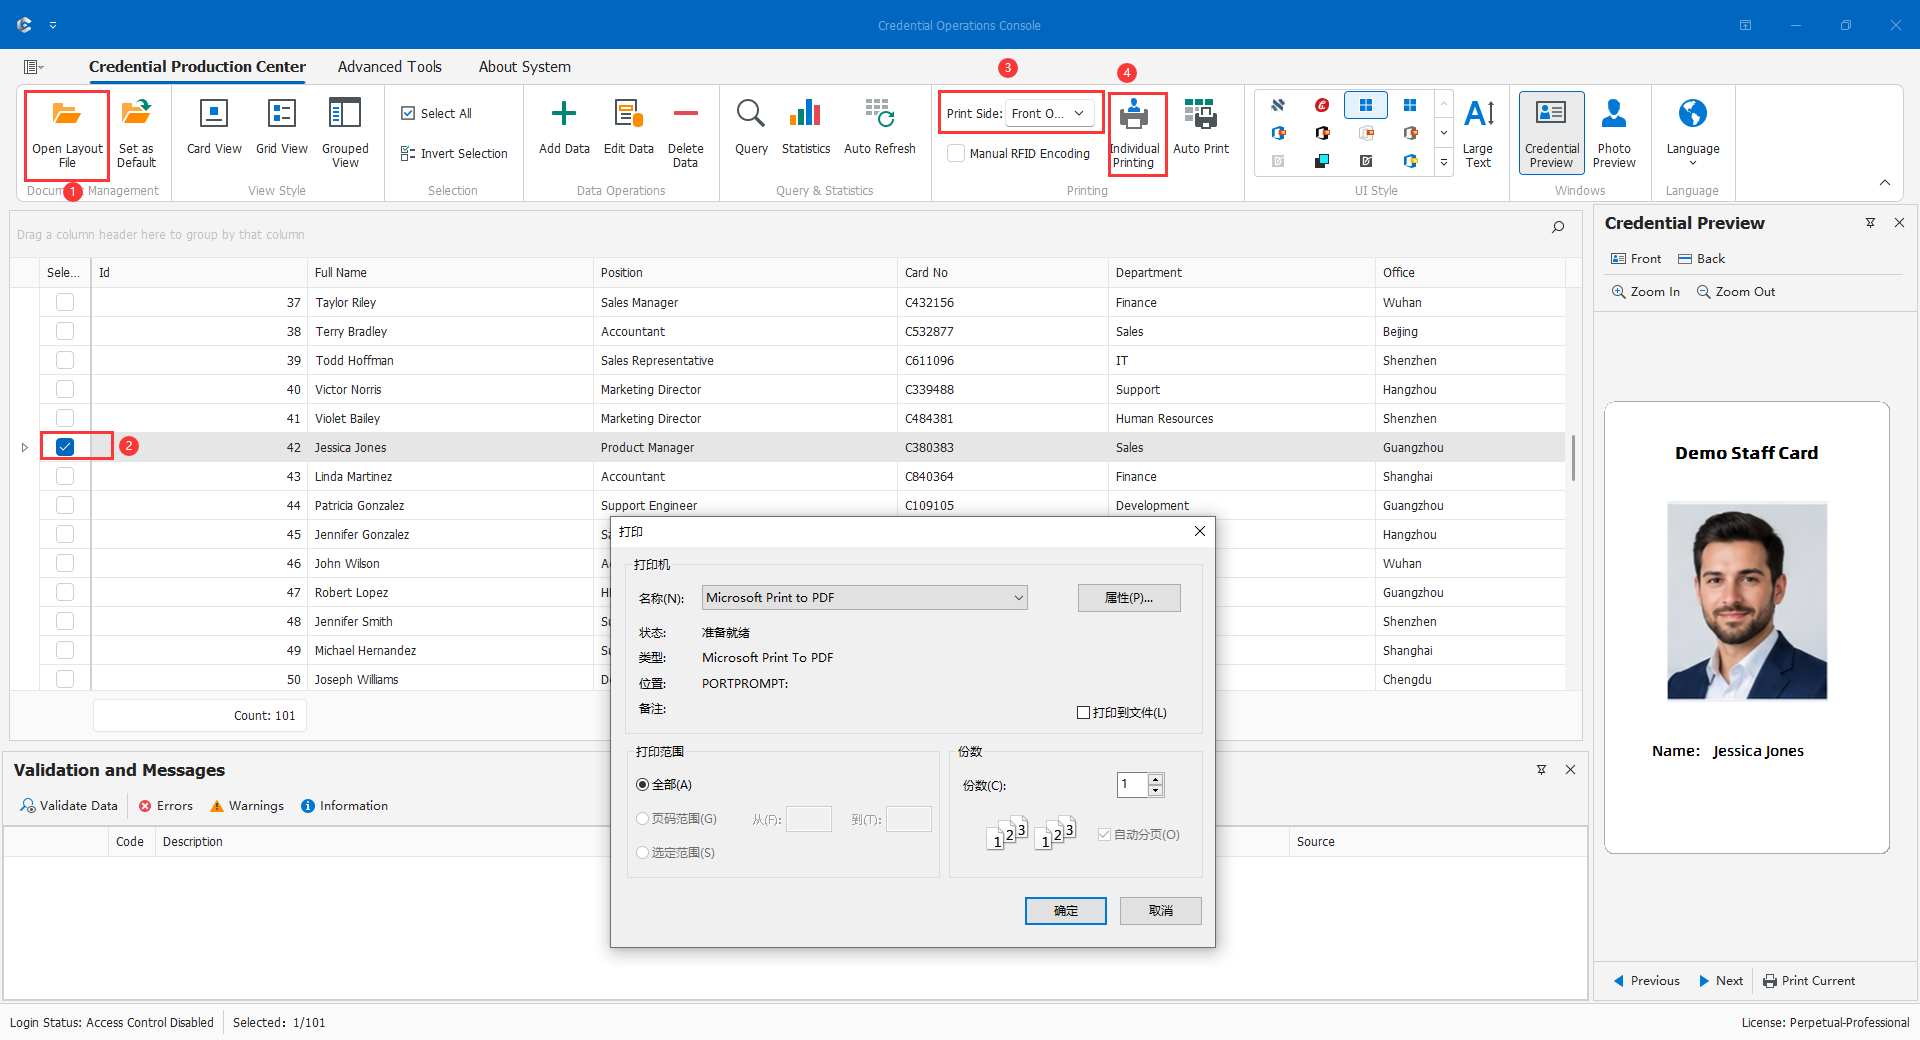
- Select Open Layout and open
DemoStaffCard.skdCard. - COC reads the saved data source configuration and loads the standard database.
- If records are not immediately visible, refresh the view and confirm that the correct layout is open.
2.6.2 Add a Demonstration Person
- Select Add Data.
- Enter a fictitious name and the other required demonstration values.
- If the layout uses a dynamic photo, load a non-sensitive demonstration portrait.
- Save and select the person in the data view.
- Check that the production preview shows the correct title, dynamic text, and photo.
Note: Use fictitious names and approved demonstration portraits for training, tests, and illustrations, not actual personnel information.
2.6.3 Preview and Print
- Select the demonstration record.
- Check the production preview for overflowing text, photo orientation, and replacement of dynamic fields with the selected record's values.
- Before a test print, select the correct printer and number of copies.
- Use Print Current for one test output.
- Confirm the result before attempting batch, duplex, or imposition printing.
2.7 Completion Check
Confirm that the project folder contains the generated SQLite database and .skdCard layout; CDPS can reopen the static and dynamic objects; COC opens the same layout and database; at least one demonstration record has been saved; and the preview shows that record correctly, ready for or checked by a single test print.
Continue with Chapter 3, then read the CDPS, COC, or production sections relevant to your role.